Saturday, November 26, 2011

Gettin' Crafty: Christmas Edition

Christmas is my favorite time of year, and I cannot wait to celebrate. Being the Holiday purist, I do not start decorating until Thanksgiving is over with....usually it means after the meal or the day after. I was lucky enough to score a four day weekend to celebrate my husband's birthday and also have time to get our tree and do a little Christmas crafting. I had been contemplating what to do with my Christmas wreath this year, I think fake flowers should be outlawed and I used feathers and ribbon for my fall wreath.

I found a post on Pinterest on how to make no-sew fabric flowers and was pretty interested to see how it would turn out. They are great to make out of leftover fabric and can be used for wreaths, hair pins, decoration, or sweater embellishments. I however did not have leftover fabric because I do not own a sewing machine. This was a great opportunity to work with some fabric, which I never get to do...no-sew is right up my alley! They recommended using Liquid Stitch, which I forgot to grab at JoAnn's, so I used hot glue with the same results. Use Liquid Stitch if you are making them with kids. When choosing your fabrics, look at the colors-not the pattern. You will not see the pattern when the flower is made, you can pick ones with puppy dogs on it and it will turn out to have swirls and flecks of other colors.

You will need:
Fabric
Hot Glue
Sissors
Grapevine wreath
Pearls, feathers, or other embellishments
*I purchased the already cut fabric squares from JoAnn's. They are about $1 a piece and will yield 10-12 flowers each.
Our Christmas decorations have always been turquoise and brown, this year I decided to add a little red (which is strange because I do not usually like red)

Step One: Cut fabric into 1" strips. Fold in half so the print is on the outside and seal with glue
The edges do not have to be perfect, it will give you a "less perfect" flower.
Step Two: Start with one end and roll. This will be the center of your flower
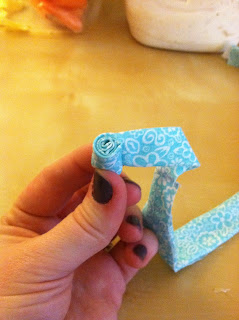
Side Note: Having a long weekend is awesome, I go to paint my fingernails! (Which is a no-no in the food biz)
Step Three: Twist the ribbon once over as you roll. This will give the flower it's petals. Play with it some! Twist one way, then the other, stop twisting and just roll, twist twice! No two flowers will be the same!
Step Four: When you reach the end of the ribbon, seal with glue. To make larger flowers, glue another ribbon strip to where you ended and keep rolling.


Here is the wreath I made, I just hot glued the flowers to the wreath and added pearls on floral wire. I also made a swag for our front door with the flowers to give it a theme. 


Lowe's gave us free branches so that I could make our swag
They are also cute as centers for bows. The curtain rod that pictures are typically hung from is turned into our stocking holder at Christmas. I will probably add some greenery to the rod if I find some on sale....


Monday, November 14, 2011

Restaurant Review: Cameron Bar & Grill

It was a rough week at work. Holiday craziness is in full effect. I am stretched thinner with an event (or two) every week, putting out fires, and additional meetings and responsibilities on top of my heavy work load. That is why it was so nice to come home after said long week to a wonderful husband who said "Baby, don't worry about cooking, let's go out and have some fun". Grabbing a cocktail with my husband is a nice treat. Neither one of us are big drinkers with me working full time and him in school and work. We may have wine with dinner, but it is totally different than going out. We were going to go to our neighborhood sports bar, because it was easy, but when we got there it was a 45 minute wait due to a college football game (we don't keep up with that mess). So we walked around the corner to The Cameron Bar & Grill. This by chance will definitely become the new go to.

The Cameron Bar & Grill located in Cameron Village has turned a new leaf since coming under new management/ownership. It has a classy adult atmosphere with plenty of wiggle room and a calming decor. While it does host several televisions over the bar, it by no means is a sports bar. The menu has "bar food" with a twist like Crab and Goat Cheese Dip, Salads, and Burgers with pimento cheese or fried green tomatoes. Sticking with our Vegan diet (with the occasional dairy when we go out), my husband ordered the spinach salad with mushrooms, goat cheese, (no) bacon, grape tomatoes, and a warm homemade balsamic vinaigrette. He was definitely impressed with the portion and flavor of the dressing. I ordered the Portobello Mushroom Wrap, flat bread topped with grilled mushrooms, roasted peppers, red onion, mixed greens, tomato, and cucumber sauce served with sweet potato fries. Whereas this may sound typical and boring, it was anything but. The meaty mushrooms were seasoned and grilled to perfection and the flat bread was warm and soft. Our meal was fresh, comforting, and along with our drinks, relaxing.

Service was great, not overly attentive-we did not have our conversation interrupted, but our glasses never stayed empty for long. After we ate at one of their high top tables, we moved to the bar to have another drink and listen to the live music that was starting up. We had a great time and will definitely be back.

Ouch, sorry for the super dark picture. My wrap and fries.
Cameron Bar & Grill on Urbanspoon

The Om Nom Life goes to Wine and Design

I love doing arts and crafts. I sometimes am too busy to do it as much as I would like, but now that we have a second bedroom, I have my very own creative space. It is something I am truly passionate about and what I need to make time to do. I took extra art classes when I was in school and at one point in time thought I'd major in art education, I chose culinary arts instead.

I was invited to a bloggers' night at the Wine and Design here in Raleigh and I was über excited to go. I have been once before with a friend, but this time I was going to go solo. At the usual $35 a pop to go, I was also looking forward to just providing myself with a snack and wine and skipping the fee.

The studio is a nice space hosting a large area with long tables. Each station comes equipped with easels, paint, and canvas. There is also an additional studio in the back for private parties.

It is amazing what you can do at this place. Even if you think you have zero artistic skill, you will walk away confident and proud of your creation. The instruction is clear and easy, you are free to work at your own pace, and tweak the colors to your liking. Whereas most of the time, I like to paint in quiet or with chill music, you will pump out your painting while listening to Top 40 surrounded by women singing along (slightly annoying, but just drink up).

I brought a deliciously smooth bottle of Shiraz and 100 calorie Brie Bites (smartest and cutest thing ever) and Pita Crackers. My favorite dinner.

Wine and Design is definitely worth checking out. It's a great treat for yourself, a fun girls night, or a romantic date night. I plan on signing my husband and I up for one of their special date nights when you work on a painting together. Here is how it went!
This is making me drool to look at it (can you tell I haven't had cheese since?)
The Om Nom creative space, coming along....

Tuesday, November 8, 2011

Chickpea Pot Pie

If you know me, you know that I love me some chickpeas. Whether it's hummus, roasted with spices, or on my salad I can never get enough. This dish was comfort during a rainy week and was what I call "a perfect fridge cleaner" meaning you can easily tweak this recipe to add whatever you have on hand.

Chickpea Pot Pie (serves 6-8)
2 cups potatoes, diced
1/2 cup carrots, diced
1/4 cup broccoli, trimmed into bite size pieces.
1 tbsp olive oil
1 medium onion, diced
1/4 cup AP flour
2 cups vegetable or vegan chicken broth
2 cups cooked chickpeas
1/2 cup frozen baby peas
1 tsp kosher salt
cracked pepper
dash of Tabasco sauce
3/4 cup cornmeal
3/4 cup AP flour
1/4 cup fresh chives, thinly sliced
1 tbsp baking powder
1 1/2 tbsp sugar
1/2 tsp salt
3/4 cup almond milk
2 tbsp olive oil
1/4 cup vegan mayonnaise

Boil the potatoes and carrots until tender but not soft and set aside. Preheat oven to 400 degrees. For the filling, heat oil a large saucepan until hot. Add the onions and sauté until they are soft. Sprinkle in the flour and mix. Allow to cook and bubble for two minutes Slowly pour in the broth, whisking well with a wire whisk. Cook the mixture over medium heat until thickened and bubbly, about 2 to 3 minutes. Add the chickpeas, peas, broccoli, cooked potatoes and carrots, salt, pepper to taste, and Tabasco. Cook on medium heat until the mixture is heated through, about 2 to 3 minutes. Pour into a casserole dish. For the crust, in a bowl combine the cornmeal, 3/4 cup flour, baking powder, sugar, chives, and salt. In a small bowl, combine the milk, oil and mayo. Add to the dry ingredients and mix. Spoon the batter evenly over the filling. Bake until the top is golden brown, about 22 to 25 minutes.

Inspiration

Words to remember and live by. Sometimes I need to remind myself to not get caught up in things that do not matter at the end of the day. My goal for November is to cook more from the heart, love my little family, and spend more time in my craft room.